|
| |
|
| |
|
Catfish
|
Wollongong, Australia
Aug 2000
time: 14:37
|
|
quote:
Originally posted by fairline
As ever this is an excellent education for us 16-bit-challenged unit designers. |
24-bit in PSP! ToT <I>renders</I> in 15-bit. Mercator will have your arse in a sling for comments like that.  It's an education for me, too. It seems that no sooner than I employ a new method and showcase the results, I am writing a guide or tutorial on it. It's an education for me, too. It seems that no sooner than I employ a new method and showcase the results, I am writing a guide or tutorial on it.
quote:
Originally posted by fairline
I had tried a little adding camo with painting in layers after your previous post, but found the results with soft blending looked a little washed out. I'll have a close look at this T-72 to see if I can suss it out.  |
Unfortunately I cleared the T-72's blend layers, so I can't offer any intermediate stages for that one. I use the Soft Light layer mainly for highlighting. If you use it for your base colour, then it will probably appear washed out. Try dropping the opacity of the brush to below 20. You may also want to try lowering the Lightness level of the colour in the <B>Materials</B> palette. If you want to modify the light levels for the entire selection, consider adding a <B>Brightness/Contrast</B> Adjustment Layer.
Whilst this isn't an example of "weathering", I do have an intermediate stage of your MiG-29 (attachment). It should, however, provide a good example of how to apply colours within each layer. Once again it's saved using PSP 8.10. The "skin" is based on the two photographs, below, of Iraqi (left) and Iranian (right) aircraft.

I performed minor structural modifications to your MiG-29 <I>before</I> and <I>after</I> the layered stage. The original (mirrored for ToT) is shown in the top-left, below, the final version, bottom-left and the screenshot, right.

quote:
Originally posted by fairline
BTW, did you used to make models? - the reference to dry-brushing and all |
I would've been about 10-11 years old the last time that I made a model. The dry brushing reference comes from painting 25mm fantasy miniatures. If I had a digital camera and time, I'd be able to convert some to Civ2 – having full control of lighting and perspective. I actually have the Shambling Mound figure shown in my third series of fantasy units.
 Attachment: mig-29 prep.zip Attachment: mig-29 prep.zip
This has been downloaded 6 time(s).
|
|
| |
|
|
Leonidas
|
Catfish:
Excellent work. Thanks for doing all this great work.
What type of models did you do?
I used to make lots of armour and planes. I spent many wintery Saturday mornings gluing and painting models. . .
Cheers!
|
|
| |
|
Catfish
|
Wollongong, Australia
Aug 2000
time: 14:37
|
|
quote:
Originally posted by Leonidas
Thanks for doing all this great work. |
You're welcome. It seems then that I haven't completely wasted my time here. I figured that only Fairline and Curt were <I>genuinely</I> interested in the thread. With the exception of the websites Fairline added, I've been the only contributor. That said, when he's done with his questions, I'll call it a day.
quote:
Originally posted by Leonidas
What type of models did you do? |
This was a <I>long</I> time ago when I was just a kid. I suppose it was a mixed bag of armour, aircraft and ships, with an emphasis on German WWII equipment.
|
|
| |
|
| |
|
| |
|
Catfish
|
Wollongong, Australia
Aug 2000
time: 14:37
|
|
quote:
Originally posted by fairline
Noooo  |
It seems that this "inability to express oneself" bug from the other thread is catching. I plan to call it a day in <I>this</I> thread, <I>not</I> Civ2 design, and only when <I>you're</I> done with the discussion. However, when I've posted graphics in the past and I've been asked how I made them, I've never been precious about trade secrets. So in that respect I guess my plan may come undone.
quote:
Originally posted by fairline
I'm sure there are more people than me and Curt learning from this - check out the number of views of this thread. Don't give up just yet. |
There are a few, but I figure it's just mild curiosity for the most part. I still believe there's a general lack of interest, most likely due to the strangely repellent nature of ToT. (Pokes that nasty ToT thing with a stick.) Even when the Civ2 palette can be loaded at the final stage, you can't hope to achieve quite the same results for the older versions of the game. Regardless, I'm pretty much done with <I>my</I> unit-making methodology for the foreseeable future. You've got the tools; it's down to the intuitive stage now.
quote:
Originally posted by fairline
As far as contributions go, I promised some kind of isometric unit drawing guide, so I guess I should do one this weekend |
You did and I expect it will attract considerable interest. Such a guide would be useful to someone like me, especially if I could make quality grey-shaded isometric units which could be painted at a later date using the methods I've described. It'd be even better if others made them instead.
quote:
Originally posted by curtsibling
I will add a title gif making guide too! |
Stop chatting and do it, man!  
|
|
| |
|
curtsibling
 |
of the Kill!
May 2002
time: 05:37
|
|
OK! 
Here is a little mini-tutorial by me, tackling that dire mystery...Titles!
1) First up, You could twiddle all day with the palette.
But in my view, the secret of titles is to have a good template gif file.
Note: Make sure your lovely image is suitable for being made into gif format.
So avoid shades of purple, pinks and garish colours, as the 256 colours of this format is a bit limited.
2) You can take any existing title.gif from a scenario and resize it to whatever dimensions take your fancy.
I tend to work at 900x700 pixels.
As a guide I will be working at this size, you can work at what suits you.
3) Create your artwork, and save it as a bmp or jpeg, and size it to the same dimensions as your (900x700) title gif.
I have made made a title gif for you to use, here it is to make your life easy!
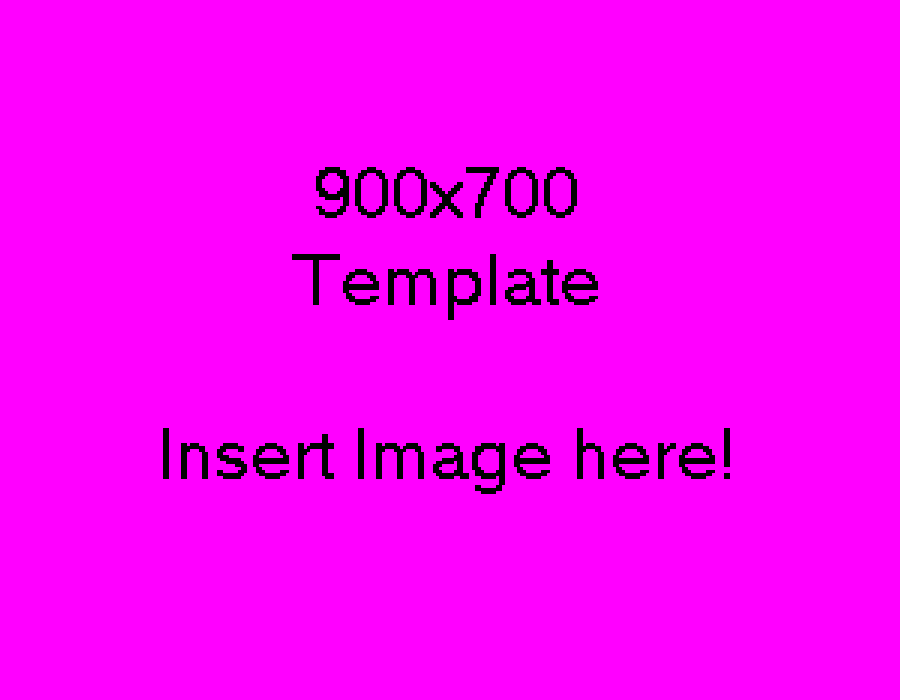
4) Now take your files into Paint Shop Pro (the civ2 modder's chum!)
I have brought in a picture called 'Zymann-body.jpg' here as my image for title transformation.
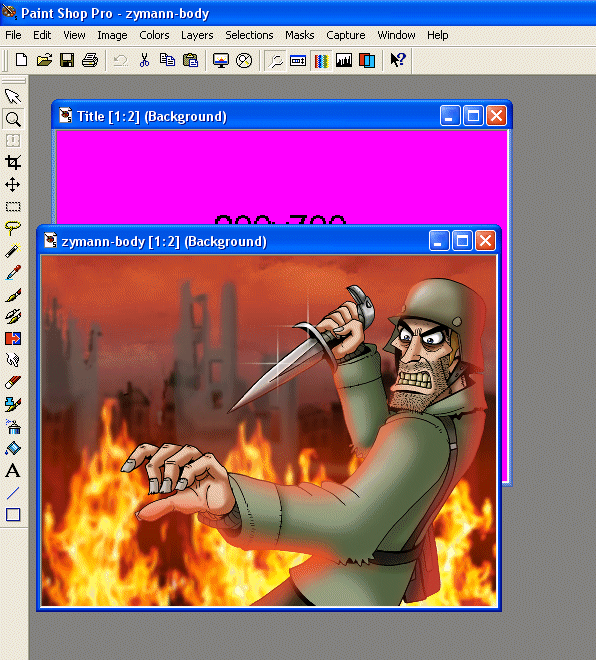
5) Now select your image (In my case Zymann-body.jpg) and press CTRL-A (select all) then CTRL-C (copy).
You image will have a mask around it like this...You are almost ready for title-dom!
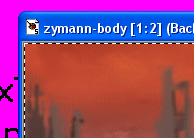
6) Now select the 'title.gif' image and press CTRL-E (Paste into) and the copied data will be in the title gif.
DON'T DESELECT YET!
7) You will notice a slight loss of quality, this is due to the limited amount of colours in a gif, compared to the jpeg.
Now move your still masked data till it's borders is flush with the borders of the title.gif.
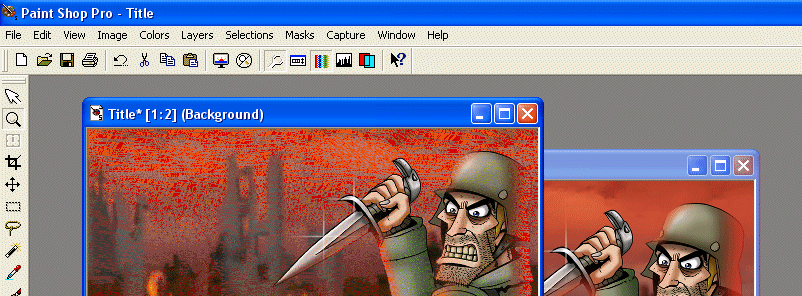
8) Now quickly save into your scenario folder and you are done! (it must ALWAYS be called Title.gif, civ2 will accept nothing else!)
Be proud! You are now a fully-qualified Title maker!
Last edited by curtsibling on 08-12-2003 at 01:46
|
|
| |
|
Catfish
|
Wollongong, Australia
Aug 2000
time: 14:37
|
|
I've got a question, Curt. Why do you paste your image into a Civ2 template as opposed to loading the Civ2 palette in the original image and then saving as Title.gif? I thought that would be simpler, and what's more you have a choice of resampling method (see below). Previously people have advised against pasting 24-bit images into Civ2 files, so there may be some other issues of which I am unaware.

Just to illustrate my point about resampling, the three methods of applying the Civ2 palette are shown below (it's in png format and might be displayed more accurately in your graphics editor than your browser). The first box shows the original 24-bit colour image. The second shows the image after the Civ2 palette is loaded using Error diffusion dithering. The third shows the same, but using Nearest colour matching. The fourth shows the results of pasting a 24-bit image into an existing Civ2 file – to me, this is indistinguishable from Nearest colour matching, so I figure this is the method used.

Here’s another example, this time using a cropped photograph. The first picture is the original 24-bit image, the second, Civ2 palette loaded with Error diffusion dithering and the third, Civ2 palette loaded with Nearest colour matching. Take your pick… or take parts from both to make a composite (the best method varies from picture to picture).

Edit: I was just updating one of my older guides and re-read my comments here. Curt, if I sound like a prat, just ignore me. You've done many top-notch title pages for your scenarios in the past, which is why I was surprised by your procedure. If I've missed something, please fill me in.
Last edited by Catfish on 10-12-2003 at 03:00
|
|
| |
|
| |
|
fairline
 |
of the wing
Sep 2002
time: 05:37
|
|
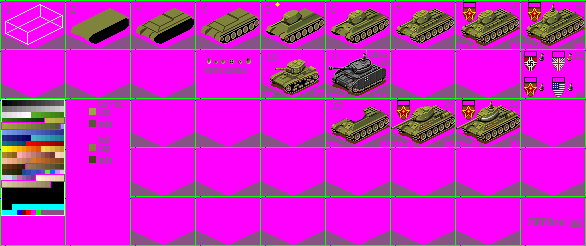
OK, I'm no teacher but for what its worth here's a guide to drawing isometric tanks. The figures in the text refer to the T34 guide.gif below. I'd recommend downloading it and opening it in your graphics program while following this guide. Always ensure you load the civ2 palette into a units file you are working on before starting to draw - there are loads of files on the net that have an incorrect palette and this may cause problems viewing them in civ. The file below has the correct palette and spare slots for drawing in to get you going. I'd also recommend using a pukka drawing program such as Paintshop Pro. Don't mess about with the Windows drawing package - it's rubbish.
First off, back to (very) basics. I'm guessing not many of you have engineering drawing experience, but you will have heard of the isometric view; figure 1 shows a rectangular block outlined in the Nemo approximation of isometric view. Notice the vertical lines are drawn as straight vertical lines while horizontal lines and planes are drawn at an angle, with each section 2 pixels long. Stick with this rule when drawing a unit.
Before starting to draw a unit get as much reference material as you can. Use a Google image search and go through every page. Of particular interest are isometric 3-d models or very nearly isometric pics of model tanks. 3-view drawings are good to check detail, with photos of the actual vehicle a good source for colour and overall appearance. The zip below contains the reference pics I used for the T34-41 and T34/85 as good examples. Open up as many of the pics as you can into your drawing program so that you can view them alongside your units file. Take it from me, this is a much easier way than copying from a book.
The first step is to rough out the hull of the tank, remembering to use vertical lines and 2-by-2 pixel diagonals (fig. 2). The idea here is to get the basic dimensions right, so don't worry about detail or colour just yet. Now start to change the drawing using a pixel-by pixel approach to give more of a feel for the shape you're after (fig. 3). You can see here that the T34's glacis and hull side plates are not in a vertical plane, so adjust the drawing to suit. The engine bay is also higher than the rest of the hull. I use a dark colour to draw the lines denoting a change in plane.
Next fit the appropriate number and size of wheels (fig.4). I would usually cut and paste wheels from Nemo tanks to speed things up, but in this instance I needed to draw some from scratch. I've included a selection of Nemo's wheels for you to cut and paste. At this stage also draw in the tracks and change the hull dimensions to suit the number of wheels you have. Remember that a tank's road wheels are often larger than the drive and trail wheels. Make sure your happy with the overall shape before moving on to the next stage - it's a lot easier to make drastic changes at this stage than later.
OK, this is the part where this thing starts to look like a tank (fig. 5). Copy the turret as closely as possible from your iso reference drawing. You have a choice of 3-views for the gun: draw it in line with the longitudinal axis of the tank as I have with the T34, draw it 'raised'as shown in the T-26 in fig 10 or move the turret to face 'left' as shown in the PzIV drawing in fig 11. In both the latter two cases, the gun is drawn as a horizontal line(s). Colour fill each plane of the tank with base colours. Use light colours for the turret (lightest) and hull top with darker colours for the sides. Bear in mind that the source of light is above and slightly behind this tank, with shadows thrown onto the hull and turret sides. To get you going, use the dropper tool on the left menu bar of PSP to select colours from this picure for your own allied tank colours.The inset shows the civ palette, with the colour ranges I've used here outlined in pink. The four base colours I use for an allied tank are next to it. It's worth noting that the T34s sloped sides are a lighter colour than a verical hull side would be.
When your happy with the basic shape of the tank, its time to add a little detail (fig 6). Add vision ports, periscopes, hatches, engine bays, aerials, anything to give the drawing some life. If your unsure of how best to make these, use Nemo's or my drawings to cut and paste the appropriate part onto your tank.
Nearly there now..... the final stages are all about detailed colouring (fig. 7) Add highlights to the edges of plane surfaces, turret hatches, engine bay grils etc. This is best done by selecting the base colour with the dropper and clicking on 'foreground colour' on the right hand side tool bar in PSP, below the palellte picture; this brings up the 'select colour from palette' selection box. To produce a highlight, select a colour 1 or 2 spaces lighter from the base colour, and similarly 1 or 2 spaces darker for shading to place shadows around raised parts like the hatches or turret. This is very much a matter of personal taste. Have a close look at fig. 7 to see what I've done with this T34. Also add detail to wheels and tracks at this point. View your unit in Civ to make sure your happy with it, and adjust as appropriate.
Lastly, add a shadow around the tank (fig. 8). You may also want a tank commander (fig. 9); I've included a selection to cut and paste in fig. 12.
Figures 13, 14 and 15 show modification of an existing unit to produce a variant, in this case the late war T-34/85. The key is to get the detail right for your new variant. Don't just add a longer gun if you want a distinctive graphic; redraw the turret and make any other adjustments required for the new tank (in this case new stowage bins, fuel tanks and headlight position).
 Attachment: t34 guide.gif Attachment: t34 guide.gif
This has been downloaded 218 time(s).
|
|
| |
|
| |
|
|
GoPostal
|
Is it possible to take an image, and somehow, in Photoshop, convert it to the Civ2 MGE palet?
|
|
| |
|
| |
|
fairline
|
of the wing
Sep 2002
time: 05:37
|
|
quote:
Originally posted by Catfish
Ah, but you've never tried. I did exactly the same thing as you did 4 or so years ago (except my units were much crappier ), until I was introduced to ToT. Don't worry too much about finding a particular colour, you can sample your own graphic with the dropper (Ctrl + Mouse Click = Very Fast) or even a source image.
|
I do ! My standard way of working is cntrl-click to dropper-select a colour, but the key part is I need to consistantly get a couple of shades (in civ2 palette-terms) lighter or darker very quickly. This is simply a matter of 2 further mouse clicks - first on the 'foreground colour' on the right menu bar and then selecting the appropriate shade from the pop-up palette. In 24-bit there are no discrete palette 'boxes' to choose from in this second stage; as you know you are presented with however many million colours to choose from in that particular hue. Adjusting lightness and darkness on the fly is a little like an artist remixing his colours rather than using those he already has on his palette (how pretentious a simile was that LOL).
quote:
You can always manually adjust the RGB and HSL settings in the <B>Materials</B> palette. If you want lighter or darker versions of your base colour, adjust the Lightness value. If you want your original colour again, sample your image. When you're creating a basic structure, stick to basic colours. Worry about better shading and fancy effects later. |
The key problem is this is a rather slow method compared to only having a choice of 256 colours  My 6-hour tanks would take 24 LOL. Thanks to your earlier tutorials I'm now fairly competent with the '24-bit' tools PSP has to offer, but I still much prefer creating a unit in a limited, and consistently and quicky selectable range of colours. My 6-hour tanks would take 24 LOL. Thanks to your earlier tutorials I'm now fairly competent with the '24-bit' tools PSP has to offer, but I still much prefer creating a unit in a limited, and consistently and quicky selectable range of colours.
I take your point about 'drybrushing' however, and I've started playing with detailed hi- and lo-lighting in 24-bit, after I've finished making the basic unit.
|
|
| |
|
|
GoPostal
|
I got it, the problem was, I have PSP Elements 2, a version with slightly less features.
|
|
| |
|
Catfish
|
Wollongong, Australia
Aug 2000
time: 14:37
|
|
quote:
Originally posted by Mercator
But you actually came with a detailed explanation...  |
BTW, just to be sure, the  was directed at my ISP alone. I need better strategic placement of my emoticons. was directed at my ISP alone. I need better strategic placement of my emoticons.
quote:
Originally posted by Mercator
But since it it "only" 15-bit, it should be possible to create some sort of a "ToT-palette" dropper image. A 256x128 pixel image would cover all 32768 colors, for instance... |
That still might prove difficult for Fairline, who finds it easier to reference an indexed palette.
Referring to my previous post, I've attached a modified greyscale palette. I swapped #E0E0E0 and #F0F0F0 for #FF00FF and #875487, respectively. Fairline, how easy/difficult would it be to make, at least, mechanised units with that palette? Imagine all of Nemo's grey German tanks. Be aware that all of the "skinned" units that I've presented in this thread have had the recoloured sections greyscaled first. A good example would be Nemo's Zero, which was done from an entirely greyscale image, with the markings painted on later.
Just trying to get the best out of you, mate.
quote:
Originally posted by GoPostal
I got it, the problem was, I have PSP Elements 2, a version with slightly less features. |
I take it you mean Photoshop, not PSP (Paint Shop Pro).
Attachment: modgreyscale.zip
This has been downloaded 9 time(s).
|
|
| |
|
| |
All times are GMT. The time now is 05:37.
Apolyton Time is 00:37. |
top of page
|
| |
|
|
|
|

 |
Amazon
UK
|
Amazon
UK |
Amazon DE |
Amazon FR |
|
Amazon DE |
Amazon FR |